
Creating and Using Subgroups
Published by Michelle Haupt on
A subgroup is a tool that allows you to pull a group of patients, responsible parties, professionals, referrers, appointments, etc., based off criteria that you select.
One way to imagine this process is if you are taking all of the data in your database and pouring it through a strainer. The holes in the strainer represent the criteria you have selected. If the information does not match that criteria, it does not pass through the strainer leaving the information you want below.
Edge Cloud comes with many subgroups already created for you including full treatment starts this month, today’s appointments, past due, referral entries this year, and many more. In addition to the defaults, there are endless possibilities for creating subgroups. Subgroups can be created for things like active patients, patients with insurance due, and various groups to send reminders to.
Creating New Subgroups
Now that we know what a subgroup is and what it does let’s take a look at how to create one. In this example, we’ll create a subgroup to show everyone who has not made a payment in more than 30 days and is 30 days past due. To start creating a subgroup, open the Subgroup Editor by selecting Editors in the Tools tab of the Home ribbon bar. Search for Subgroups.
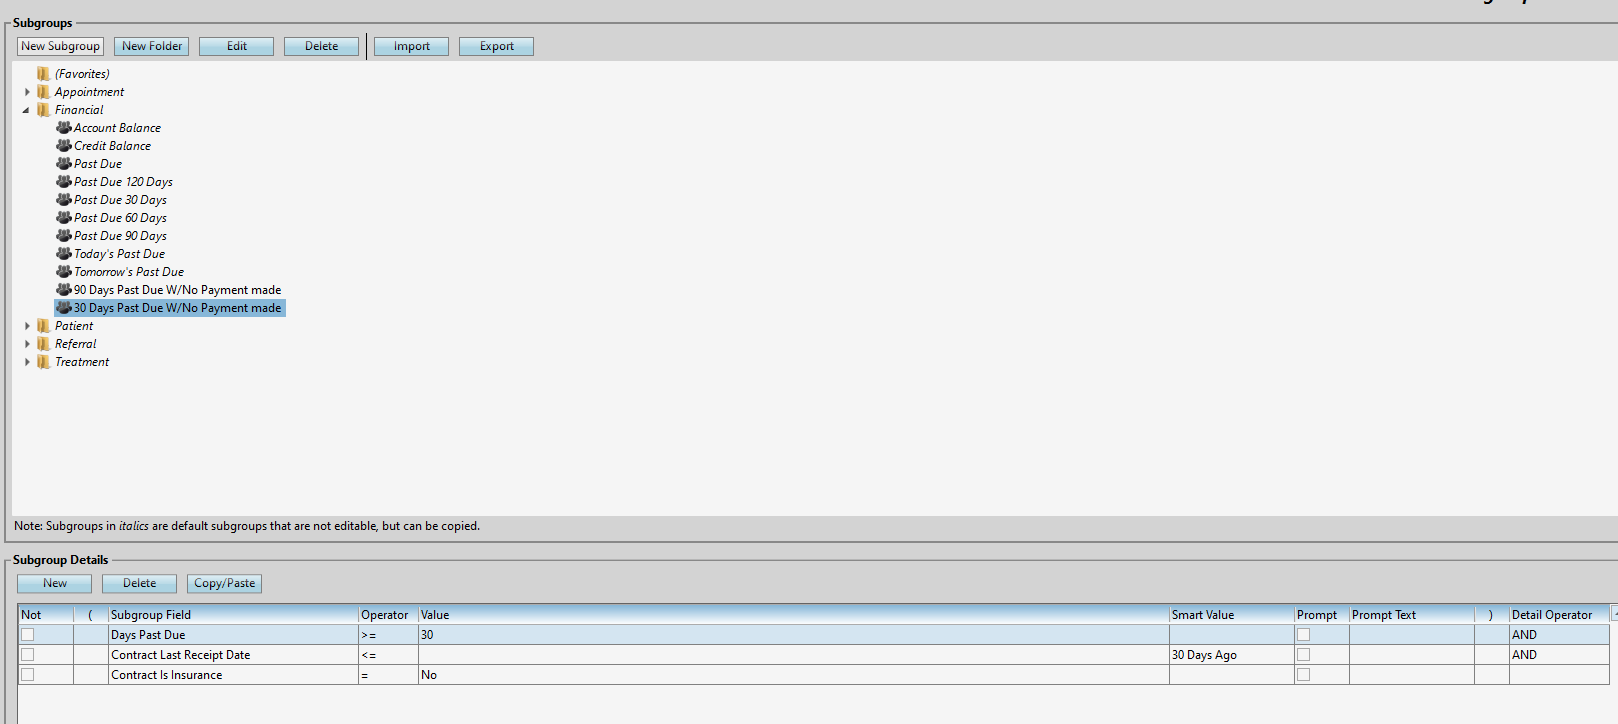
The Subgroup Editor is made up of two pieces – folders and subgroups. The folders are a way to organize the subgroups into categories so you can easily find the subgroup you are looking for. To create the subgroup, select the folder you want it to be in (for this example, click Financial) and click the New Subgroup button. Name the subgroup, and click OK.
Once you have the subgroup created, fill in the criteria of the subgroup using the Subgroup Detail section at the bottom of the editor. Click New in the subgroup details to add a line of criteria to the subgroup. For our example, we need three pieces of criteria: the account is 30 days past due, there hasn’t been a payment on the account in more than 30 days, and the contract isn’t an insurance contract.
Subgroup Editor Set UPUnder Subgroup Details, click New. Search for Days Past Due, select it, and click OK. In the Operator drop down, chose greater than or equal to (>=). In the Value column, type 30. This is saying you want to include patients who are greater than or equal to 30 days past due. There is more criteria to meet, so again, click on New under Subgroup Details. This time search and select Contract Last Receipt Date. Set the Operator to less than or equal to (<=) and the Smart Value to 30 Days Ago. The final criteria to set is Contract is Insurance. Since we don’t want to include insurance contracts, set the Operator to equal to (=) and the Value to No. Because you want the people in this subgroup to meet all of this criteria, leave the Detail Operator to AND for the first two subgroup fields.
With this subgroup set up, use the Subgroup Widget on the Dashboard to see the people in this subgroup. To learn more about subgroups, watch our visual help video. Or if you need assistance creating a subgroup, contact the Software Support Team at 800.346.4504 or ortho2support@ortho2.com.
Questions, comments, or a great blog idea brewing? Email us — we're all ears.