
Using Treatment Findings With Edge Animations
Published by Michelle Haupt on
Edge Animations can be used for a variety of reasons – educating patients and parents about treatment, reminding them about how important compliance is, and marketing your practice on social media.
You can use Edge Animations in conjunction with patient treatment findings to create a collection of videos to show patients treatment for their specific needs.
Setting Up Treatment Findings
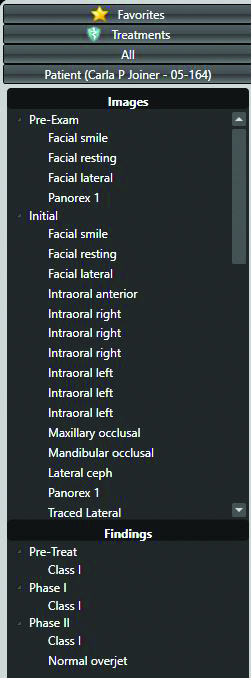
Each patient will need to have defined treatment findings. Set up findings – both categories and responses – in the Treatment Findings editor. Open a patient and click the Treatment Findings button in the patient folder header. In the Findings section, click Edit. This will allow you to choose categories and responses that pertain to that patient. When you have the findings filled out, click save on the home ribbon bar.
Now, while still in the patient folder, click the Animations icon in the Patient ribbon bar. This launches Edge Animations with the patient’s information. Along the tabs on the left, you will notice your patient’s information – name, patient ID, images, and findings – in addition to the library of videos, your treatment videos, and favorites.
Creating Treatment Animations
Using the library, create a filmstrip based on one of your treatment findings, such as Class I crowding. Once the filmstrip is created, click the Add to Treatments button Treatment Findings Animations. The Enter Treatment Name dialog box will come up. In theEA tab-1 Treatment Name box, type in the response used in the patient’s treatment finding. The name of the finding and the treatment name must be exact - it is case sensitive. If you would like, enter a description for the treatment animation. Click OK. Exit Edge Animations.
While in the patient’s folder, ensure they have the corresponding finding in their findings. Relaunch Edge Animations from the patient’s folder. Now, in the patient tab you will see the animation that corresponds to the patient’s finding.
Once you have set up a filmstrip based on a treatment finding, each patient that has that particular finding will have the filmstrip in their patient tab in Edge Animations. Additionally, these filmstrips will be saved in the treatment tab of Edge Animations, and can be used with any patient, regardless of their specific treatment findings.
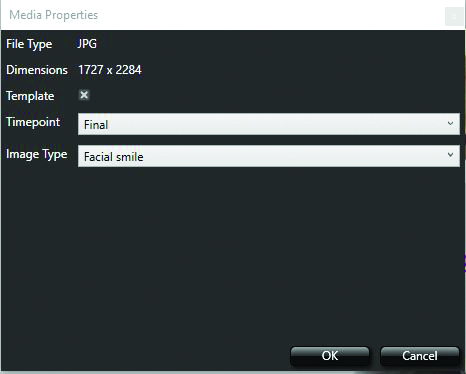
Customizing with Images
You can further customize these animations with individual patient images. While creating animations, openProperties the patient tab of your animations, and add an image to the time line. You can do this for each patient, or you can create a template so the correct photo of each patient is pulled into the animation. To do this, right click the image in the animation and click Properties. Click the box next to Template, and choose the Timepoint and Image Type.
It’s that easy! If you have any questions about how to use Edge Animations and Treatment Findings, contact the Ortho2 Software Support Team at 800.346.4504.
Questions, comments, or a great blog idea brewing? Email us — we're all ears.