Edge Cloud Smart Scheduler
Published by Michelle Haupt on
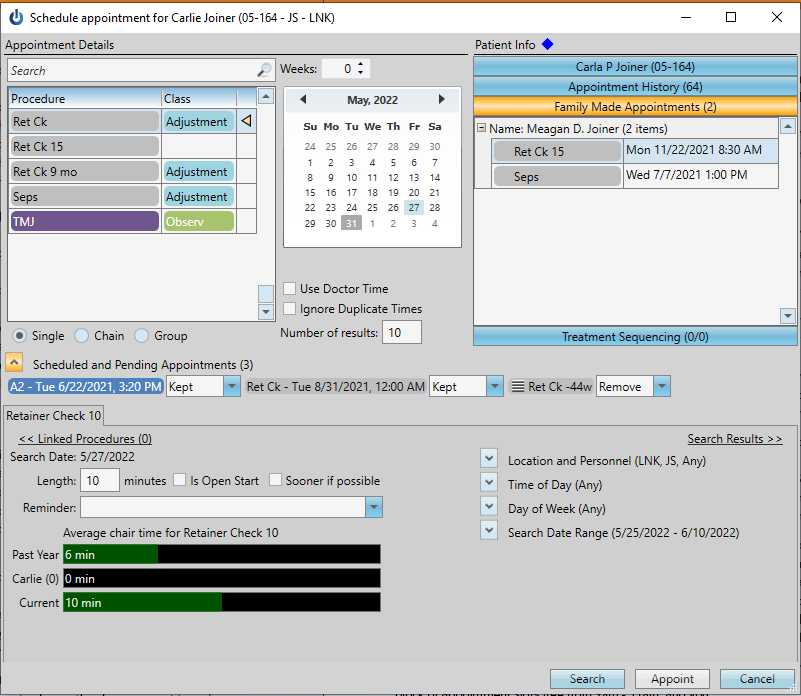
The Smart Scheduler is one of the more powerful tools in Edge Cloud. Use the Smart Scheduler to search for, identify, and schedule patient appointments. Just select your appointment type, the desired date or number of weeks out, and other details to narrow or widen the search for available appointment time slots. You can even use the Smart Scheduler to schedule near other family member appointments.
There are many benefits to using the Smart Scheduler. The first is that it is faster to search for open spots for the specific type of appointment you want to schedule. In addition, anyone can schedule an appointment even if they aren’t familiar with the set up. Using the Smart Scheduler allows someone to only schedule appointments where the schedule dictates. Setting up classes and using the Smart Scheduler to schedule your appointments means you can set up your ideal day and schedule for it.
In order for the Smart Scheduler to work properly, your office needs to apply classes in two parts of the software: the appointment procedures and on the Scheduler templates. Using classes like this restricts appointment types to specific parts of the Scheduler. For example, if you want to make sure your banding and bonding appointments are only scheduled for morning appointments, one way to do that is with classes.
Setting Up Classes
How you label your classes is completely up to you. Some practices use appointment types to describe their classes, like adjustments, exams, or starts. Other practices use classes that describe the length of the procedure, like short, medium, or long. There isn’t a right way to set up classes, beyond what you find works best for you.
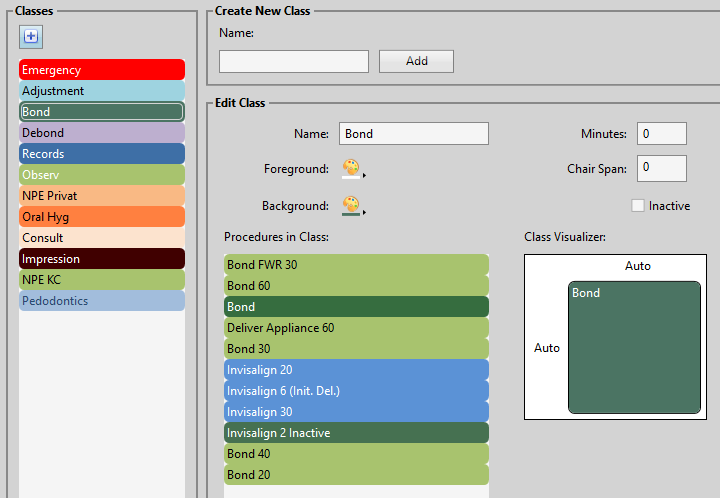
Open the Editors from the Tools tab of the Home ribbon bar. In the Scheduling section, open the Classes editor. To create a new class, type a description in the Create New Class portion of the window, and click Add. Then enter a class name, colors, and other details.
As you are choosing colors for your classes, keep in mind that before an appointment is scheduled, your grid template displays the colors of the class assigned to that cell (if any). After an appointment is scheduled, your grid template displays the colors of the procedure scheduled to that cell. Thus, you might want to coordinate your classification colors and associated appointment colors. In the Classes editor, you can see what the class will look like in your Scheduler. Save your changes.
Assigning Procedures to Classes
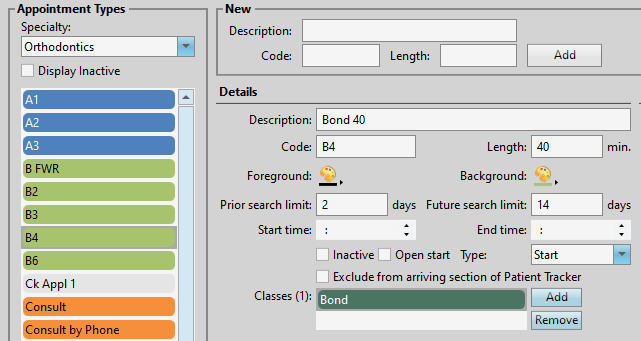
After your classes are set up, you now need to assign your appointment procedures to the classes you created. In the Editors, select the Procedures editor from the Scheduling section. Select a procedure to work with. In the Details section of this editor, you will find a section for Classes. Select a class of grid cells that this procedure should be scheduled to. If it can be scheduled to multiple classes, you can add additional classes as needed. Click Add. Do this for each appointment procedure your office uses. Save your changes.
Applying Classes to Grid Templates
The final step in setting up classes is applying them to your Grid templates. In the Editors, select Scheduler Templates from the Scheduling section. Choose an established template to work with, or create a new one. Then, click the Edit Grid Template button. This opens the Grid Template editor.
Click an individual cell you want to work with, or click and drag to select a range of cells. You can also click the first cell, then press your Shift key while you click the last cell of a consecutive group, or press your Ctrl key while you click additional individual non-consecutive cells.
In the Cell Editor tab of the Scheduler ribbon bar, use the drop down menu to choose the class you want to assign. Click the arrow beside the Class field. Do this for the Status, Text, Foreground, and Background colors. Repeat these two steps with the next set of cells you want to categorize.
A note about the Status option – you can classify a cell, or a number of cells as Open Start. This status is used if you want appointments to begin with this cell. When you use the Smart Scheduler to schedule patient appointments, you can require that appointment openings begin with a cell flagged as Open Start.
Setting the Smart Scheduler Options
Now that you have your classes identified and working with your appointment procedures and schedule, set up the Smart Scheduler user options to define how your Smart Scheduler works for you. Open the Scheduler, click User Options in the Actions tab, and then choose Smart Scheduler in the menu on the right. These settings are defaults only: you can enable/disable these features while using the Smart Scheduler.
Maximum Number of Search Results – Select the number of available appointment openings to include.
Ignore Duplicate Times When Searching – Enable this option to list an available appointment time only once, regardless of the number of chairs you have open at that time.
Use Doctor Time in Searches – Choose whether you want the Smart Scheduler to calculate doctor time already scheduled for other chairs when selecting available appointment openings. If this feature is enabled, the Smart Scheduler will ignore chairs that look available, but would cause doctor time to be overbooked for that time interval.
Search Blocks of Time Equal to Appointment Length – When this option is enabled, your Smart Scheduler search results will be set apart at least by the length of the appointment being searched for. For example, if you have a block of appointment slots free from 9 A.M.-11 A.M., and you are searching for a half-hour appointment, enabling this option will produce search results for 9 A.M., 9:30 A.M., 10:00 A.M., etc.. However, if this option is disabled, your search will include results for each available time slot (i.e. for a scheduling template with a 10-minute increment, you would get results for 9:00 A.M., 9:10 A.M., 9:20 A.M., etc.)
Default Orthodontist, Office, Assistant Search Filter – Select which orthodontist, office, and assistant to use as the default filter. Choose Value Assigned to Patient to use the patient’s assigned doctor, office, and/or assistant as the default search filter.
Click Ok to save any changes to your user options and exit the window.
Using the Smart Scheduler
You can open the Smart Scheduler in a variety of ways; the most common is from the Scheduler > Actions tab of the Scheduler ribbon bar > Smart Scheduler. You can review the patient’s appointment history with their average arrival time, kept appointment percentage, and whether he or she prefers a certain day or time for the appointment in the Patient Info section. If the patient has a sibling, you can view scheduled appointments for each sibling as well.
In the Appointment Details section, select the appointment procedure, target search date, and other details you want the Smart Scheduler to look for. The default options you chose when you set up your user options will be included.
At the bottom of the Smart Scheduler, you can narrow or expand your search for available appointment openings by specifying a location, doctor, or assistant, and limiting the search to specific days, times, and dates. Click the down arrow beside each setting that you want to change to open the details for that parameter.
Click Search. The Smart Scheduler window toggles to show you the search results, including the available dates and times, and associated doctor, office, assistance, number of days from your target date, currently scheduled percentage for that day, and any Scheduler notes.
You can use the Search Results » and « Search Details links to toggle between viewing the appointment and search details you selected, and the list of available openings. You might do this, for example, if you need to adjust the appointment and search details to expand or narrow your list of openings. If you do change any search details, be sure to click Search at the bottom of the window again to refresh the list of results.
When you are satisfied with the appointment details, click Appoint.
Smart Scheduler, Edge Cloud, Patient Scheduling, Scheduling, Appointment Classes, Appointment Procedures, Patient Appointments
Questions, comments, or a great blog idea brewing? Email us — we're all ears.


